Generate a new payment link in the Unity Portal or via the API.
To create links, you first need to activate the service in the Unity Portal. We also recommend going through the other Setup guides.
- In the Unity Portal, go to Links.
- Click New Link in the top-right.
A side panel opens with the creation form.
- In the Payment page tab, fill in the General information section:
- Merchant transaction ID: A unique identifier for this transaction.
- Intent: The transaction intent. Learn more.
- Amount and currency: Details about the payment amount and currency. Enter the transaction amount and select the currency code in ISO 4217 format.
- Site: Select a site. Only sites that have the service activated are displayed. This selection determines which branding and settings apply.
- Shopper country: The country code, in ISO 3166-1 alpha-2 format.
- Next, complete the Link configuration section:
- Link name: A human-readable link name. This is solely for display purposes in the Unity Portal, for easier identification.
- Link type: The type of link to create.
Note that with open-use links, you won't be able to perform merchant-initiated, card-on-file transactions, or any other operation that requires knowing the customer's identity.
- Link validity: The number of hours until the link expires.
- AVS: The type of AVS.
- Optionally, choose which payment methods to accept with this specific link. By default, all payment methods configured for this site are accepted.
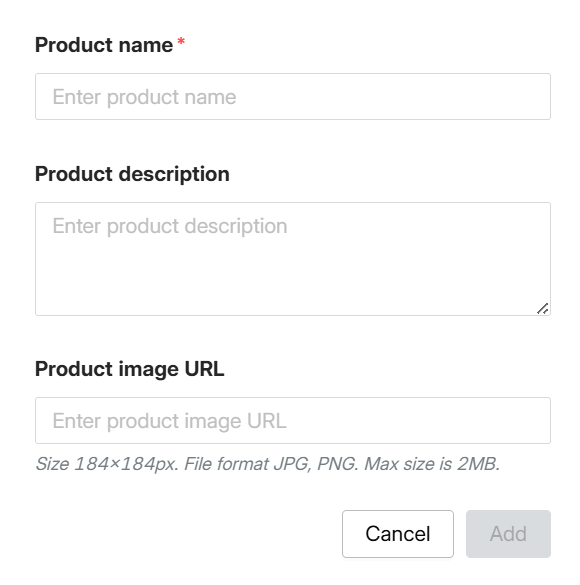
- Next, click Add product in the Product info section. You'll need to enter a product name and optionally, add a product description and product image. Click Add to confirm.

- Lastly, search for the shopper data fields that you'd like to make mandatory. Learn more about shopper data.
In the After payment tab, choose between showing a confirmation page (default setting) or redirecting customers to your website URL. You can replace the message on the confirmation page with your own. Note that this isn't localised.
When you're done, click Create link to generate your payment link. If the button isn't active, then at least one required field is missing.
Your new payment link URL is displayed and ready to be used.
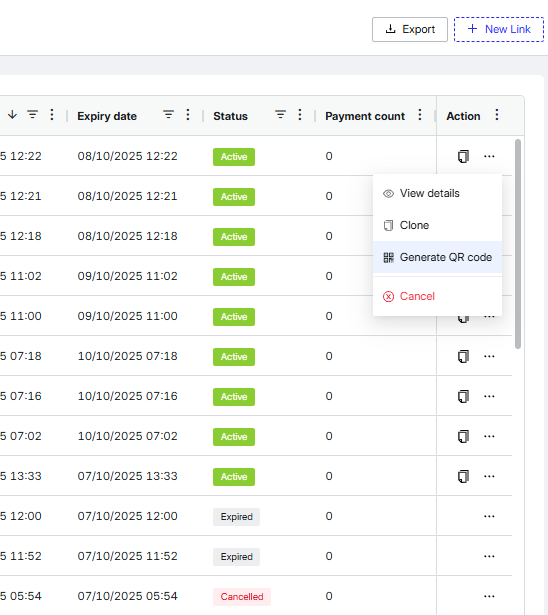
In the Action column, click the copy icon () to copy the URL or click ... > Generate QR code to create a QR code that you can either download or copy.

Make sure to review all configuration details before you share it with your customers.
Use the following request to create a payment link.
curl -i -X POST \
  https://api-services.pxp.io/api/v1/links \
  -H "Content-Type: application/json" \
  -H "Authorization: PXP-UST1 e0c3d199-0884-4ac7-ab8b-dc97cff87f7d:1725607935:A1B2C3D4E5F6789012345678901234567890ABCDEF1234567890ABCDEF123456" \
  -H "X-Request-Id: 550e8400-e29b-41d4-a716-446655440000" \
  -H "X-Client-Id: b14d0efd-b57f-470a-932d-c5d8517ff021" \
  -d '{
    "merchantTransactionId": "ORDER-2025-001",
    "amounts": {
      "transaction": 29.99,
      "currencyCode": "USD"
    },
    "products": [
      {
        "name": "Premium Widget",
        "description": "High-quality widget with advanced features",
        "productImageUrl": "https://example.com/product-image.jpg"
      }
    ],
    "linkConfiguration": {
      "type": "SingleUse",
      "name": "Invoice Payment Link",
      "expiresInHours": 72
    },
    "shopper": {
      "countryCode": "US",
      "merchantShopperId": "CUST_001",
      "shopperInputPreferences": {
        "email": true,
        "firstName": true,
        "lastName": true,
        "address": false
      }
    },
    "site": "site-1",
    "merchant": "merchant-1",
    "intent": "Purchase",
    "avs": {
      "type": "SkipAvs"
    },
    "allowedFundingTypes": {
      "cards": ["Visa", "Mastercard", "AmericanExpress"],
      "wallets": ["PayPal"]
    },
    "afterPaymentConfiguration": {
      "afterPaymentConfigurationType": "Redirect",
      "redirectUrl": "https://yourstore.com/payment-success",
      "customMessage": "Thank you for your purchase!"
    }
}'| Parameter | Description |
|---|---|
merchantTransactionIdstring (≤ 50 characters) required | A unique identifier for this transaction. |
amountsobject required | Details about the payment amount and currency. |
amounts.transactionnumber required | The transaction amount. |
amounts.currencyCodestring (3 characters) required | The currency code, in ISO 4217 format. |
productsarray (≥ 1 item) required | Array of product information for display on the payment page. |
products.namestring (≤ 100 characters) required | The product name. |
products.descriptionstring (≤ 500 characters) | The product description. |
products.productImageUrlstring | The URL of the product image. |
linkConfigurationobject required | Details about the link behaviour. |
linkConfiguration.typestring required | The type of link to create. Possible values:
|
linkConfiguration.namestring (≤ 100 characters) | A human-readable link name. This is solely for display purposes in the Unity Portal, for easier identification. |
linkConfiguration.expiresInHoursinteger | The number of hours until the link expires. |
shopperobject required | Details about the customer. |
shopper.countryCodestring (2 characters) required | The country code, in ISO 3166-1 alpha-2 format. |
shopper.merchantShopperIdstring | Your internal customer ID. |
shopper.shopperInputPreferencesobject | Details about the shopper input preferences. |
shopper.shopperInputPreferences.emailboolean | Whether to require the customer's email address. |
shopper.shopperInputPreferences.phoneNumberboolean | Whether to require the customer's phone number. |
shopper.shopperInputPreferences.firstNameboolean | Whether to require the customer's first name. |
shopper.shopperInputPreferences.lastNameboolean | Whether to require the customer's last name. |
shopper.shopperInputPreferences.addressboolean | Whether to require the customer's address. |
shopper.shopperInputPreferences.dateOfBirthboolean | Whether to require the customer's date of birth. |
shopper.shopperInputPreferences.customerNumberboolean | Whether to require the customer's reference number. |
shopper.shopperInputPreferences.productSpecificationsboolean | Whether to require product-specific fields. |
sitestring required | Your merchant site identifier from your PXP configuration. |
merchantstring required | Your merchant identifier from your PXP configuration. |
intentstring (enum) required | The transaction intent. Learn more. Possible values:
|
avsobject required | Details about the AVS. |
avs.type string required | The type of AVS. Possible values:
|
avs.addressVerificationobject | Pre-filled address verification data. This is required when the AVS type is EnableAvsMerchantProvidedAddress. |
avs.addressVerification.countryCodestring (2 characters) required | The country code, in ISO 3166-1 alpha-2 format. |
avs.addressVerification.houseNumberOrNamestring (≤ 100 characters) required | The house number or building name. |
avs.addressVerification.postalCodestring (≤ 10 characters) required | The postal/ZIP code. |
allowedFundingTypesobject | Details about the allowed funding types. |
allowedFundingTypes.cardsarray | The list of allowed card types. Possible values:
|
allowedFundingTypes.walletsarray | The list of allowed wallets. Possible values:
|
afterPaymentConfigurationobject | Details about the post-payment behaviour. |
afterPaymentConfiguration.afterPaymentConfigurationTypestring required | The type of post-payment experience. Possible values:
|
afterPaymentConfiguration.redirectUrlstring | The HTTPS URL to redirect the customer to. This is required if afterPaymentConfigurationType is set to Redirect. |
afterPaymentConfiguration.customMessagestring (≤ 500 characters) | The custom message to display on the confirmation page. This only applies if afterPaymentConfigurationType is set to ConfirmationPage. |
If your request is successful, you'll receive a 200 response containing the payment link details, including its url. You can now view and manage your payment link in the Unity Portal's Links section.
{
  "linkId": "06da69e0-b668-40b2-ba2f-6c505f08866c",
  "url": "https://links.dev.pxp.io/06da69e0-b668-40b2-ba2f-6c505f08866c",
  "status": "Active",
  "expirationTimestamp": "2025-09-11T04:12:15.3044876Z",
  "site": "site-1",
  "amounts": {
    "transaction": 29.99,
    "currencyCode": "USD"
  },
  "merchantTransactionId": "ORDER-2025-001",
  "merchantShopperId": "CUST_001",
  "afterPaymentConfiguration": {
    "afterPaymentConfigurationType": "Redirect",
    "redirectUrl": "https://yourstore.com/payment-success",
    "customMessage": "Thank you for your purchase!"
  }
}| Parameter | Description |
|---|---|
linkIdstring (UUID) | The unique payment link identifier generated by PXP. Use this for tracking and management operations. |
urlstring (URL) | The complete payment link URL that you can share with customers. This is the link customers will use to make their payment. |
statusstring (enum) | The current status of the payment link. Possible values:
|
expirationTimestampstring (ISO 8601) | The date and time when the link expires, in UTC. After this time, the link will no longer accept payments. |
sitestring | The site identifier used in the request, confirming the merchant configuration. |
amountsobject | Details about the payment amount and currency. |
merchantTransactionIdstring | Your transaction identifier from the request, used for reconciliation and tracking. |
merchantShopperIdstring | The customer identifier, if provided in the request. |
afterPaymentConfigurationobject | Details about the post-payment behaviour. |
- Use appropriate link validity periods that aren't too long, for security reasons. For high-value transactions in particular, consider shorter expiration times.
- Use shopper IDs consistently for your returning customers.
- Include product information when possible.
- Choose appropriate shopper data collection. Only request the information you need.
- Provide clear instructions when sharing links.
- Include expiration information in communications.
- Offer alternative payment methods for expired links.
- Always test your links before sharing them with customers.
- Ensure your branding is professional and recognisable.